27 KiB
Getting Started
Demonstrates setting up your own public key infrastructure (PKI) and certificate authority (CA) using step ca
and getting certificates using the step command line tool and SDK.
Check out Getting started with docker to run step certificates using docker.

Prerequisites
Terminology
PKI - Public Key Infrastructure
A set of roles, policies, and procedures needed to create, manage, distribute, use, store, and revoke digital certificates and manage public-key encryption. The purpose of a PKI is to facilitate the secure electronic transfer of information for a range of network activities.
Provisioners
Provisioners are people or code that are registered with the CA and authorized to issue "provisioning tokens". Provisioning tokens are single use tokens that can be used to authenticate with the CA and get a certificate.
See provisioners.md for more information on the supported provisioners and its options.
Initializing PKI and configuring the Certificate Authority
To initialize a PKI and configure the Step Certificate Authority run:
NOTE:
step ca initonly initialize an x509 CA. If you would like to initialize an SSH CA as well, add the--sshflag.
step ca init [--ssh]
You'll be asked for a name for your PKI. This name will appear in your CA certificates. It doesn't really matter what you choose. The name of your organization or your project will suffice.
If you run:
tree $(step path)
You should see:
.
├── certs
│   ├── intermediate_ca.crt
│   ├── root_ca.crt
│   ├── ssh_host_key.pub (--ssh only)
│   └── ssh_user_key.pub (--ssh only)
├── config
│   ├── ca.json
│   └── defaults.json
└── secrets
    ├── intermediate_ca_key
    ├── root_ca_key
    ├── ssh_host_key (--ssh only)
    └── ssh_user_key (--ssh only)
The files created include:
-
root_ca.crtandroot_ca_key: the root certificate and private key for your PKI. -
intermediate_ca.crtandintermediate_ca_key: the intermediate certificate and private key that will be used to sign leaf certificates. -
ssh_host_key.pubandssh_host_key(--sshonly): the SSH host pub/priv key pair that will be used to sign new host SSH certificates. -
ssh_user_key.pubandssh_user_key(--sshonly): the SSH user pub/priv key pair that will be used to sign new user SSH certificates. -
ca.json: the configuration file necessary for running the Step CA. -
defaults.json: file containing default parameters for thestepCA cli interface. You can override these values with the appropriate flags or environment variables.
All of the files ending in _key are password protected using the password
you chose during PKI initialization. We advise you to change these passwords
(using the step crypto change-pass utility) if you plan to run your CA in a
non-development environment.
What's Inside ca.json?
ca.json is responsible for configuring communication, authorization, and
default new certificate values for the Step CA. Below is a short list of
definitions and descriptions of available configuration attributes.
-
root: location of the root certificate on the filesystem. The root certificate is used to mutually authenticate all api clients of the CA. -
crt: location of the intermediate certificate on the filesystem. The intermediate certificate is returned alongside each new certificate, allowing the client to complete the certificate chain. -
key: location of the intermediate private key on the filesystem. The intermediate key signs all new certificates generated by the CA. -
password: optionally store the password for decrypting the intermediate private key (this should be the same password you chose during PKI initialization). If the value is not stored in configuration then you will be prompted for it when starting the CA. -
address: e.g.127.0.0.1:8080- address and port on which the CA will bind and respond to requests. -
dnsNames: comma separated list of DNS Name(s) for the CA. -
logger: the default logging format for the CA istext. The other option isjson. -
db: data persistence layer. See database documentation for more info.-
type:
badger,bbolt,mysql, etc. -
dataSource:
stringthat can be interpreted differently depending on the type of the database. Usually a path to where the data is stored. See the database configuration docs for more info. -
database: name of the database. Used for backends that may have multiple databases. e.g. MySQL
-
valueDir: directory to store the value log in (Badger specific).
-
-
tls: settings for negotiating communication with the CA; includes acceptable ciphersuites, min/max TLS version, etc. -
authority: controls the request authorization and signature processes.-
template: default ASN1DN values for new certificates. -
claims: default validation for requested attributes in the certificate request. Can be overriden by similar claims objects defined by individual provisioners.-
minTLSCertDuration: do not allow certificates with a duration less than this value. -
maxTLSCertDuration: do not allow certificates with a duration greater than this value. -
defaultTLSCertDuration: if no certificate validity period is specified, use this value. -
disableIssuedAtCheck: disable a check verifying that provisioning tokens must be issued after the CA has booted. This is one prevention against token reuse. The default value isfalse. Do not change this unless you know what you are doing.
SSH CA properties
-
minUserSSHDuration: do not allow certificates with a duration less than this value. -
maxUserSSHDuration: do not allow certificates with a duration greater than this value. -
defaultUserSSHDuration: if no certificate validity period is specified, use this value. -
minHostSSHDuration: do not allow certificates with a duration less than this value. -
maxHostSSHDuration: do not allow certificates with a duration greater than this value. -
defaultHostSSHDuration: if no certificate validity period is specified, use this value. -
enableSSHCA: enable all provisioners to generate SSH Certificates. The deault value isfalse. You can enable this option per provisioner by setting it totruein the provisioner claims.
-
-
provisioners: list of provisioners. See the provisioners documentation. Each provisioner has an optionalclaimsattribute that can override any attribute defined at the level above in theauthority.claims.
-
step ca init will generate one provisioner. New provisioners can be added by
running step ca provisioner add.
Running the CA
To start the CA run:
export STEPPATH=$(step path)
step-ca $STEPPATH/config/ca.json
Systemctl
Consider adding a service user that will only be used by systemctl to manage
the service.
$ useradd step
$ passwd -l step
Use the following example as a base for your systemctl service file:
[Unit]
Description=step-ca
After=syslog.target network.target

[Service]

User=step
Group=step
ExecStart=/bin/sh -c '/bin/step-ca /home/step/.step/config/ca.json --password-file=/home/step/.step/pwd >> /var/log/step-ca/output.log 2>&1'
Type=simple
Restart=on-failure
RestartSec=10

[Install]
WantedBy=multi-user.target
The following are a few example commands you can use to check the status,
enable on restart, and start your systemctl service.
# Check the current status of the `step-ca` service
$ systemctl status step-ca
# Configure the `step-ca` process to startup on reboot automatically
$ systemctl enable step-ca
# Start the `step-ca` service.
$ systemctl start step-ca
Configure Your Environment
Note: Configuring your environment is only necessary for remote servers
(not the server on which the step ca init command was originally run).
Many of the cli utilities under step ca [sub-command] interface directly with
a running instance of the Step CA. The CA exposes an HTTP API and clients are
required to connect using HTTP over TLS (aka HTTPS). As part of bootstraping
the Step CA, a certificate was generated using the root of trust that was
created when you initilialized your PKI. In order to properly validate this
certificate clients need access to the public root of trust, aka the public root
certificate. If you are using the step cli on the same host where you
initialized your PKI (the root_ca.crt is stored on disk locally), then you can
continue to setting up your environment,
otherwise we will show you how to easily download your root certificate in the
following step.
Download the Root Certificate
The next few steps are a guide for downloading the root certificate of your PKI from a running instance of the CA. First we'll define two servers:
-
remote server: This is the server where the Step CA is running. This may also be the server where you initialized your PKI, but for security reasons you may have done that offline.
-
local server: This is the server that wants access to the
step ca [sub-command] -
ca-url: This is the url at which the CA is listening for requests. This should be a combination of the DNS name and port entered during PKI initialization. In the examples below we will use
https://ca.smallstep.com:8080.
-
Get the Fingerprint.
From the remote server:
$ FP=$(step certificate fingerprint $(step path)/certs/root_ca.crt) -
Bootstrap your environment.
From the local server:
$ step ca bootstrap --fingerprint $FP --ca-url "https://ca.smallstep.com:8080" $ cat $(step path)/config/defaults.json -
Test.
$ step ca health
Setting up Environment Defaults
This is optional, but we recommend you populate a defaults.json file with a
few variables that will make your command line experience much more pleasant.
You can do this manually or with the step command step ca bootstrap:
$ step ca bootstrap \
  --ca-url https://ca.smallstep.com:8080 \
  --fingerprint 0d7d3834cf187726cf331c40a31aa7ef6b29ba4df601416c9788f6ee01058cf3
# Let's see what we got...
$ cat $STEPPATH/config/defaults.json
{
  "ca-url": "https://ca.smallstep.com:8080",
  "fingerprint": "628cfc85090ca65bb246d224f1217445be155cfc6167db4ed8f1b0e3de1447c5",
  "root": "/Users/<you>/src/github.com/smallstep/step/.step/certs/root_ca.crt"
}
# Test it out
$ step ca health
-
ca-url is the DNS name and port that you used when initializing the CA.
-
root is the path to the root certificate on the file system.
-
fingerprint is the root certificate fingerprint (SHA256).
You can always override these values with command-line flags or environment variables.
To manage the CA provisioners you can also add the property ca-config with
the path to the CA configuration file, with that property you won't need to add
it in commands like step ca provisioners [add|remove].
Note: to manage provisioners you must be on the host on which the CA is
running. You need direct access to the ca.json file.
Hot Reload
It is important that the CA be able to handle configuration changes with no downtime.
Our CA has a built in reload function allowing it to:
- Finish processing existing connections while blocking new ones.
- Parse the configuration file and re-initialize the API.
- Begin accepting blocked and new connections.
reload is triggered by sending a SIGHUP to the PID (see man kill
for your OS) of the Step CA process. A few important details to note when using reload:
- The location of the modified configuration must be in the same location as it
was in the original invocation of
step-ca. So, if the original command was
$ step-ca ./.step/config/ca.json
then, upon reload, the Step CA will read it's new configuration from the same
configuration file.
-
Step CA requires the password to decrypt the intermediate certificate, again, upon
reload. You can automate this in one of two ways:- Use the
--password-fileflag in the original invocation. - Use the top level
passwordattribute in theca.jsonconfiguration file.
- Use the
Let's issue a certificate!
There are two steps to issuing a certificate at the command line:
- Generate a provisioning token using your provisioning credentials.
- Generate a CSR and exchange it, along with the provisioning token, for a certificate.
If you would like to generate a certificate from the command line, the Step CLI provides a single command that will prompt you to select and decrypt an authorized provisioner and then request a new certificate.
$ step ca certificate "foo.example.com" foo.crt foo.key
If you would like to generate certificates on demand from an automated configuration management solution (no user input) you would split the above flow into two commands.
$ TOKEN=$(step ca token foo.example.com \
    --kid 4vn46fbZT68Uxfs9LBwHkTvrjEvxQqx-W8nnE-qDjts \
    --ca-url https://ca.example.com \
    --root /path/to/root_ca.crt  --password-file /path/to/provisioner/password)

$ step ca certificate "foo.example.com" foo.crt foo.key --token "$TOKEN"
You can take a closer look at the contents of the certificate using step certificate inspect:
$ step certificate inspect foo.crt
List|Add|Remove Provisioners
The Step CA configuration is initialized with one provisioner; one entity that is authorized by the CA to generate provisioning tokens for new certificates. We encourage you to have many provisioners - ideally one for each entity in your infrastructure.
Why should I be using multiple provisioners?
- Each certificate generated by the Step CA contains the ID of the provisioner
that issued the provisioning token authorizing the creation of the cert. This
ID is stored in the X.509 ExtraExtensions of the certificate under
OID: 1.3.6.1.4.1.37476.9000.64.1and can be inspected by runningstep certificate inspect foo.crt. These IDs can and should be used to debug and gather information about the origin of a certificate. If every member of your ops team and the configuration management tools all use the same provisioner to authorize new certificates you lose valuable visibility into the workings of your PKI. - Each provisioner should require a unique password to decrypt it's private key -- we can generate unique passwords for you but we can't force you to use them. If you only have one provisioner then every entity in the infrastructure will need access to that one password. Jim from your dev ops team should not be using the same provisioner/password combo to authorize certificates for debugging as Chef is for your CICD - no matter how trustworthy Jim says he is.
Let's begin by listing the existing provisioners:
$ bin/step ca provisioner list
Now let's add a provisioner for Jim.
$ bin/step ca provisioner add jim@smallstep.com --create
NOTE: This change will not affect the Step CA until a reload is forced by
sending a SIGHUP signal to the process.
List the provisioners again and you will see that nothing has changed.
$ bin/step ca provisioner list
Now let's reload the CA. You will need to re-enter your intermediate
password unless it's in your ca.json or you are using --password-file.
$ ps aux | grep step-ca   # to get the PID
$ kill -1 <pid>
Once the CA is running again, list the provisioners, again.
$ bin/step ca provisioner list
Boom! Magic.
Now suppose Jim forgets his password ('come on Jim!'), and he'd like to remove
his old provisioner. Get the kid (Key ID) of Jim's provisioner by listing
the provisioners and finding the appropriate one. Then run:
$ bin/step ca provisioner remove jim@smallstep.com --kid <kid>
Then reload the CA and verify that Jim's provisioner is no longer returned
in the provisioner list.
We can also remove all of Jim's provisioners, supposing Jim forgot all the passwords ('really Jim?'), by running the following:
$ bin/step ca provisioner remove jim@smallstep.com --all
The same entity may have multiple provisioners for authorizing different types of certs. Each of these provisioners must have unique keys.
Use Custom Claims for Provisioners to Control Certificate Validity etc
It's possible to configure provisioners on the CA to issue certs using properties specific to their target environments. Most commonly different validity periods and disabling renewals for certs. Here's how:
$ step ca init
# complete the init steps
$ step ca provisioner add --create dev@smallstep.com
# lets create a provisioner for dev certs
Please enter a password to encrypt the provisioner private key? password
# add claims inside a provisioner element in ~/.step/config/ca.json
~/.step/config/ca.json
[...]
"authority": {
   "provisioners": [
      {
         "name": "you@smallstep.com",
         "type": "jwk",
         "key": {
            "use": "sig",
            "kty": "EC",
            "kid": "Kg43gSukHnl8f5NztLPDxqpz_9TNUILnMrIMIa70jOU",
            "crv": "P-256",
            "alg": "ES256",
            "x": "So0JVWFFXo-6GmDwq6WWZZk-AFZt5GKTx5PzdLhdsrQ",
            "y": "kVz8pCl2Qx9fZmJZhXGrHpufwNDTp7oHwi8Zaj7rhiQ"
         },
         "encryptedKey": "...",
+        "claims": {
+           "minTLSCertDuration": "5s",
+           "maxTLSCertDuration": "12h",
+           "defaultTLSCertDuration": "2h",
+           "disableRenewal": true
+        }
      }
   ]
},
[...]

## launch CA...
$ step-ca $(step path)/config/ca.json
Please enter the password to decrypt ~/.step/secrets/intermediate_ca_key: password
2019/02/21 12:09:51 Serving HTTPS on :9443 ...
See the provisioner doc for details on all available provisioner claims.
The durations are strings which are a sequence of decimal numbers, each with
optional fraction and a unit suffix, such as "300ms" or "2h45m". Valid time
units are "ns", "us" (or "µs"), "ms", "s", "m", "h".
Now certs issued by the dev@smallstep.com provisioner will be valid for two
hours and deny renewals. Command line flags allow validity extension up to 12h,
please see step ca certificate's docs for details.
# grab a cert, will also work with 'step ca token' flow
$ step ca certificate localhost site.crt site.key
Use the arrow keys to navigate: ↓ ↑ → ←
What provisioner key do you want to use?
    IY7gYg_cDKmXtcs1sbhdBDDb9K9YvLO5aHzArjaayso (sebastian@smallstep.com)
  ▸ uBYWYDCpeJu_IYzMGPZ1LJJTdlaiJQfdpkOVewbjy-8 (dev@smallstep.com)

✔ Please enter the password to decrypt the provisioner key: password
✔ CA: https://ca.smallstep.com:9443/1.0/sign
✔ Certificate: site.crt
✔ Private Key: site.key

$ step certificate inspect site.crt --format json | jq .validity
{
  "start": "2019-02-21T20:19:06Z",
  "end": "2019-02-21T22:19:06Z",
  "length": 7200
}

# renewals will be denied for certs issued by this provisioner
$ step ca renew site.crt site.key
error renewing certificate: Unauthorized
Use Oauth OIDC to obtain personal certificates
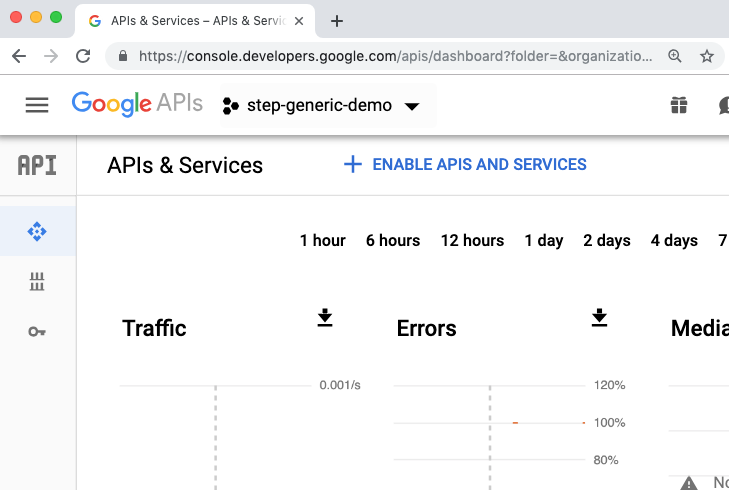
To authenticate users with the CA you can leverage services that expose OAuth OpenID Connect identity providers. One of the most common providers, and the one we'll use in this example, is G-Suite.
Navigate to the Google APIs developer console and pick a suitable project from the top navbar's dropdown.
In the masthead navigation click Credentials (key symbol) and then "OAuth
consent screen" from the subnav. Fill out naming details, all mandatory fields,
and decide if your app is of type Public or Internal. Internal
will make sure the access scope is bound to your G-Suite organization.
Public will let anybody with a Google Account log in, incl.
gmail.com accounts.
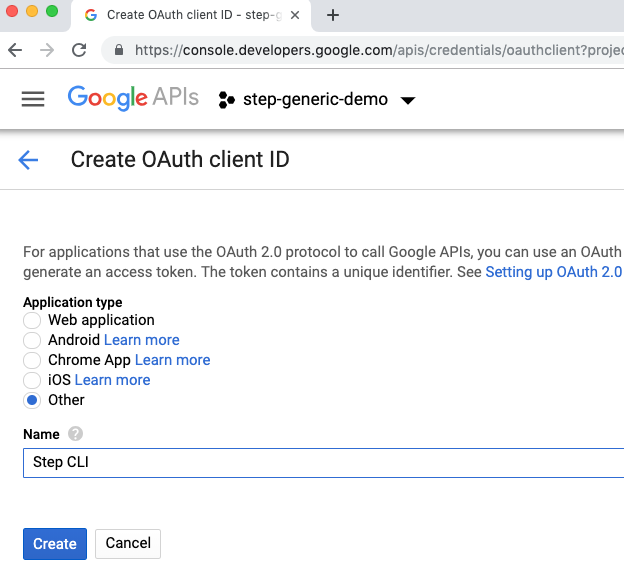
Move back to Credentials on the subnav and choose "OAuth client ID" from the
Create credentials dropdown. Since OIDC will be used from the step CLI pick Other
from the available options and pick a name (e.g. Step CLI).
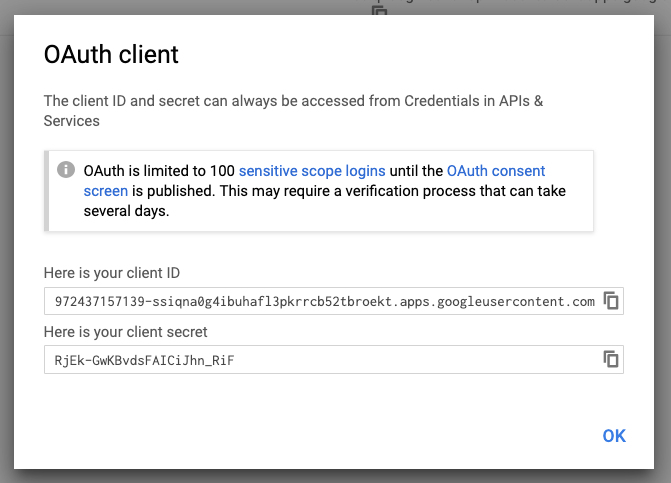
On successful completion, a confirmation modal with both clientID and
clientSecret will be presented. Please note that the clientSecret will
allow applications access to the configured OAuth consent screen. However, it
will not allow direct authentication of users without their own MfA credentials
per account.
Now using clientID and clientSecret run the following command to add
G-Suite as a provisioner to step certificates. Please see step ca provisioner add's docs
for all available configuration options and descriptions.
$ step ca provisioner add Google --type oidc --ca-config $(step path)/config/ca.json \
  --client-id 972437157139-ssiqna0g4ibuhafl3pkrrcb52tbroekt.apps.googleusercontent.com \
  --client-secret RjEk-GwKBvdsFAICiJhn_RiF \
  --configuration-endpoint https://accounts.google.com/.well-known/openid-configuration \
  --domain yourdomain.com --domain gmail.com
Start up the online CA or send a HUP signal if it's already running to reload
the configuration and pick up the new provisioner. Now users should be able to
obtain certificates using the familiar step ca certificate flow:
$ step ca certificate sebastian@smallstep.com personal.crt personal.key
Use the arrow keys to navigate: ↓ ↑ → ←
What provisioner key do you want to use?
    fYDoiQdYueq_LAXx2kqA4N_Yjf_eybe-wari7Js5iXI (admin)
  ▸ 972437157139-ssiqna0g4ibuhafl3pkrrcb52tbroekt.apps.googleusercontent.com (Google)
✔ Key ID: 972437157139-ssiqna0g4ibuhafl3pkrrcb52tbroekt.apps.googleusercontent.com (Google)
✔ CA: https://localhost
✔ Certificate: personal.crt
✔ Private Key: personal.key

$ step certificate inspect --short personal.crt                                                                 ⏎
X.509v3 TLS Certificate (ECDSA P-256) [Serial: 6169...4235]
  Subject:     106202051347258973689
               sebastian@smallstep.com
  Issuer:      Local CA Intermediate CA
  Provisioner: Google [ID: 9724....com]
  Valid from:  2019-03-26T20:36:28Z
          to:  2019-03-27T20:36:28Z
Now it's easy for anybody in the G-Suite organization to obtain valid personal certificates!
Notes on Securing the Step CA and your PKI.
In this section we recommend a few best practices when it comes to running, deploying, and managing your own online CA and PKI. Security is a moving target and we expect out recommendations to change and evolve as well.
Initializing your PKI
When you initialize your PKI two private keys are generated; one intermediate private key and one root private key. It is very important that these private keys are kept secret. The root private key should be moved around as little as possible, preferably not all - meaning it never leaves the server on which it was created.
Passwords
When you initialize your PKI (step ca init) the root and intermediate
private keys will be encrypted with the same password. We recommend that you
change the password with which the intermediate is encrypted at your earliest
convenience.
$ step crypto change-pass $STEPPATH/secrets/intermediate_ca_key
Once you've changed the intermediate private key password you should never have to use the root private key password again.
We encourage users to always use a password manager to generate random passwords or let Step CLI generate passwords for you.
The next important matter is how your passwords are stored. We recommend using a password manager. There are many to choose from and the choice will depend on the risk & security profile of your organization.
In addition to using a password manager to store all passwords (private key, provisioner, etc.) we recommend using a threshold cryptography algorithm like Shamir's Secret Sharing to divide the root private key password across a handful of trusted parties.
Provisioners
When you initialize your PKI (step ca init) a default provisioner will be created
and it's private key will be encrypted using the same password used to encrypt
the root private key. Before deploying the Step CA you should remove this
provisioner and add new ones that are encrypted with new, secure, random passwords.
See the section on managing provisioners.
Deploying
- Refrain from entering passwords for private keys or provisioners on the command line.
Use the
--password-fileflag whenever possible. - Run the Step CA as a new user and make sure that the config files, private keys, and passwords used by the CA are stored in such a way that only this new user has permissions to read and write them.
- Use short lived certificates. Our default validity period for new certificates
is 24 hours. You can configure this value in the
ca.jsonfile. Shorter is better - less time to form an attack. - Short lived certificates are not a replacement for CRL and OCSP. CRL and OCSP are features that we plan to implement, but are not yet available. In the mean time short lived certificates are a decent alternative.
- Keep your hosts secure by enforcing AuthN and AuthZ for every connection. SSH access is a big one.
Notes on Running Step CA as a Highly Available Service
CAUTION: step-ca is built to scale horizontally. However, the creators
and maintainers do not regularly test in an HA environment using mulitple
instances. You may run into issues we did not plan for. If this happens, please
open an issue.
Considerations
A few things to consider / implement when running multiple instances of step-ca:
-
Use
MySQLDB: The defaultBadgerDB cannot be read / written by more than one process simultaneously. The only supported DB that can support multiple instances isMySQL. See the database documentation for guidance on configuringMySQL.- The ACME server has known concurrency limitations when using the same account to manage multiple orders. The recommended temporary workaround is to generate an ephemeral account keypair for each new ACME order, or to ensure that ACME orders owned by the same account are managed serially. The issue tracking this limitation can be found here.
-
Synchronize
ca.jsonacross instances:step-careads all of it's configuration (and all of the provisioner configuration) from theca.jsonfile specified on the command line. If theca.jsonof one instance is modified (either manually or using a command likestep ca provisioner (add | remove)) the other instances will not pick up on this change until theca.jsonis copied over to the correct location for each instance and the instance itself isSIGHUP'ed (or restarted). It's recommended to use a configuration management (ansible, chef, salt, puppet, etc.) tool to synchronizeca.jsonacross instances.