|
|
4 years ago | |
|---|---|---|
| .githooks | 4 years ago | |
| .github | 4 years ago | |
| .vscode | 4 years ago | |
| 00_before_we_start | 4 years ago | |
| 01_wait_forever | 4 years ago | |
| 02_runtime_init | 4 years ago | |
| 03_hacky_hello_world | 4 years ago | |
| 04_zero_overhead_abstraction | 4 years ago | |
| 05_safe_globals | 4 years ago | |
| 06_drivers_gpio_uart | 4 years ago | |
| 07_uart_chainloader | 4 years ago | |
| 08_timestamps | 4 years ago | |
| 09_hw_debug_JTAG | 4 years ago | |
| 10_privilege_level | 4 years ago | |
| 11_virtual_memory | 4 years ago | |
| 12_exceptions_part1_groundwork | 4 years ago | |
| 13_integrated_testing | 4 years ago | |
| X1_JTAG_boot | 4 years ago | |
| doc | 4 years ago | |
| docker | 4 years ago | |
| utils | 4 years ago | |
| .editorconfig | 5 years ago | |
| .gitignore | 4 years ago | |
| .rubocop.yml | 4 years ago | |
| .rustfmt.toml | 5 years ago | |
| Gemfile | 4 years ago | |
| LICENSE-APACHE | 5 years ago | |
| LICENSE-MIT | 4 years ago | |
| README.CN.md | 4 years ago | |
| README.md | 4 years ago | |
| SPONSORING.md | 4 years ago | |
| contributor_setup.sh | 4 years ago | |
| devtool | 4 years ago | |
README.md
Operating System development tutorials in Rust on the Raspberry Pi
![]()
![]()
![]()
![]()
ℹ️ Introduction
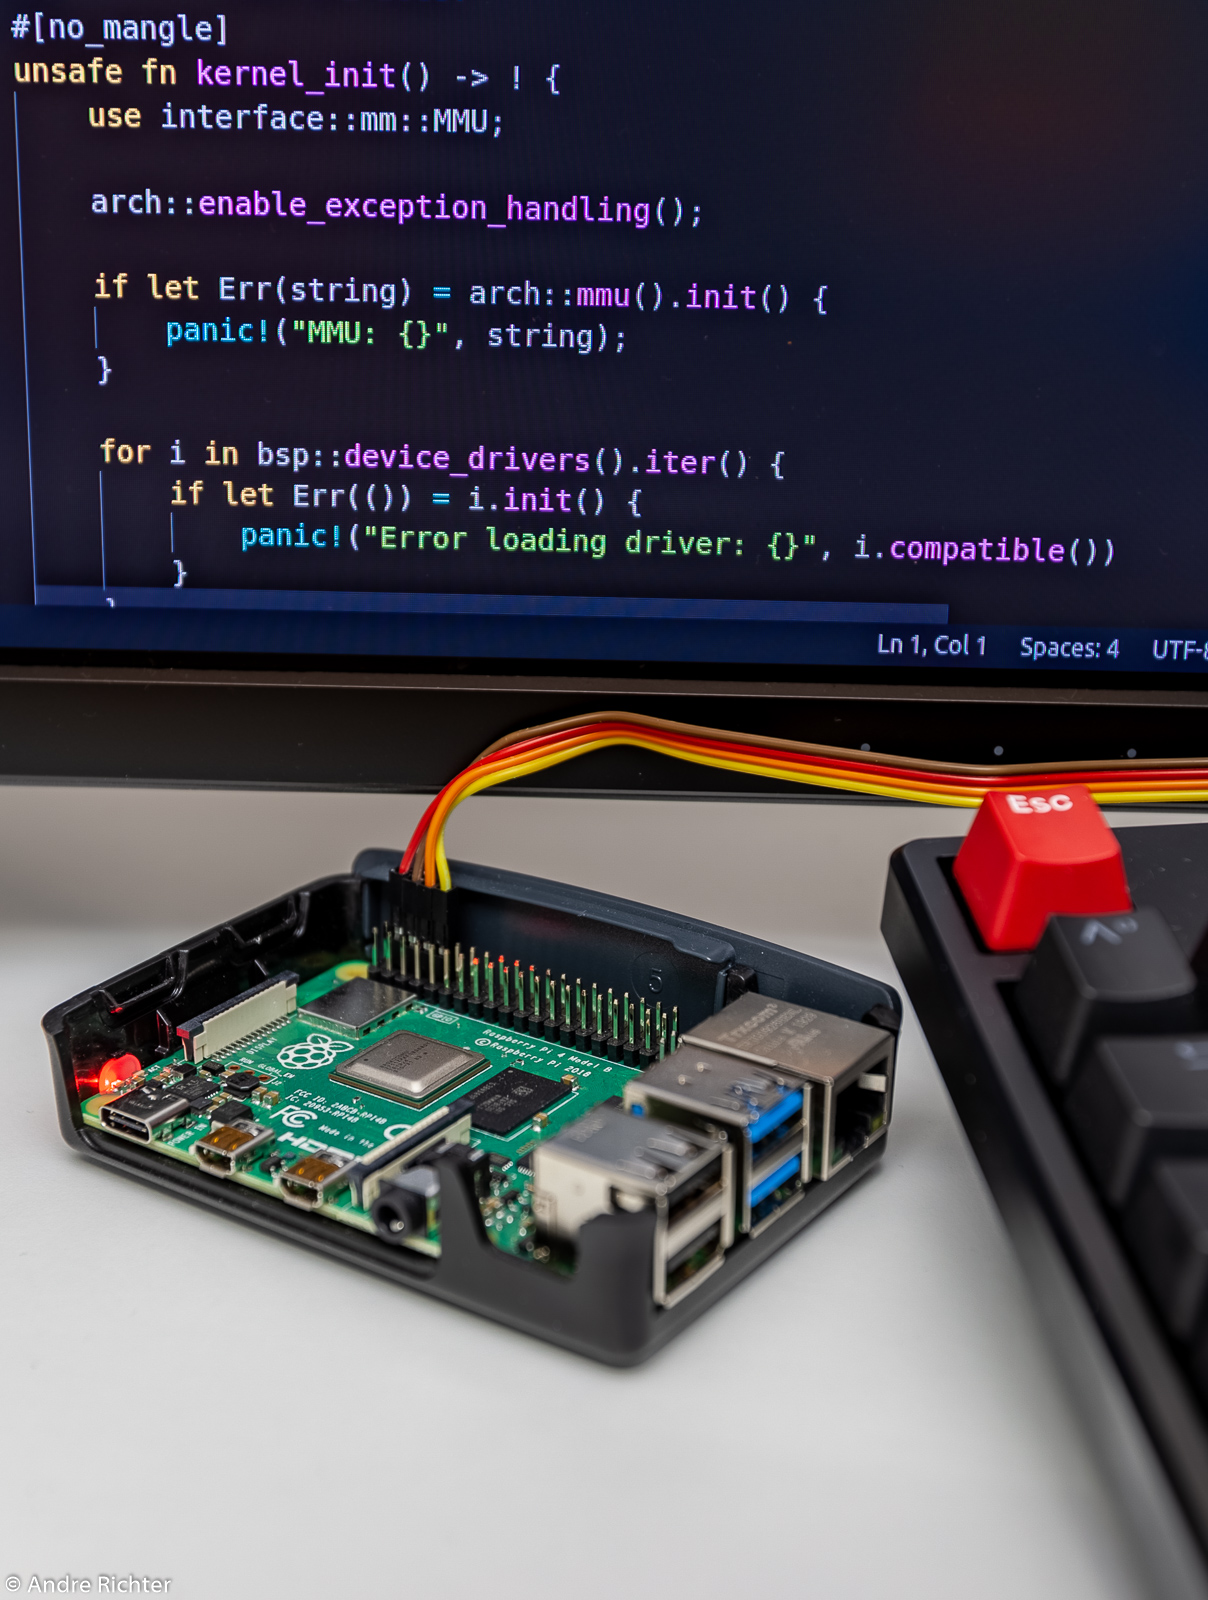
This is a tutorial series for hobby OS developers who are new to ARM's 64 bit
ARMv8-A architecture. The tutorials will give a guided, step-by-step tour of
how to write a monolithic Operating System kernel for an embedded system
from scratch. They cover implementation of common Operating Systems tasks, like
writing to the serial console, setting up virtual memory and handling HW
exceptions. All while leveraging Rust's unique features to provide for safety
and speed.
Cheers, Andre (@andre-richter)
P.S.: In the future, Chinese 🇨🇳 versions of the tutorials will be maintained as README.CN.md by @colachg and @readlnh.
📑 Organization
- Each tutorial contains a stand-alone, bootable
kernelbinary. - Each new tutorial extends the previous one.
- Each tutorial
READMEwill have a shorttl;drsection giving a brief overview of the additions, and show the source codediffto the previous tutorial, so that you can conveniently inspect the changes/additions.- Some tutorials have a full-fledged, detailed text in addition to the
tl;drsection. The long-term plan is that all tutorials get a full text, but for now this is exclusive to tutorials where I think thattl;dranddiffare not enough to get the idea.
- Some tutorials have a full-fledged, detailed text in addition to the
- The code written in these tutorials supports and runs on the Raspberry Pi
3 and the Raspberry Pi 4.
- Tutorials 1 till 5 are groundwork code which only makes sense to run in
QEMU. - Starting with tutorial 6, you can load and run the
kernel on Raspberrys and observe output over
UART.
- Tutorials 1 till 5 are groundwork code which only makes sense to run in
- Although the Raspberry Pi 3 and 4 are the main target boards, the code is
written in a modular fashion which allows for easy porting to other CPU
architectures and/or boards.
- I would really love if someone takes a shot at a RISC-V implementation!
- For editing, I recommend Visual Studio Code with Rust Analyzer.
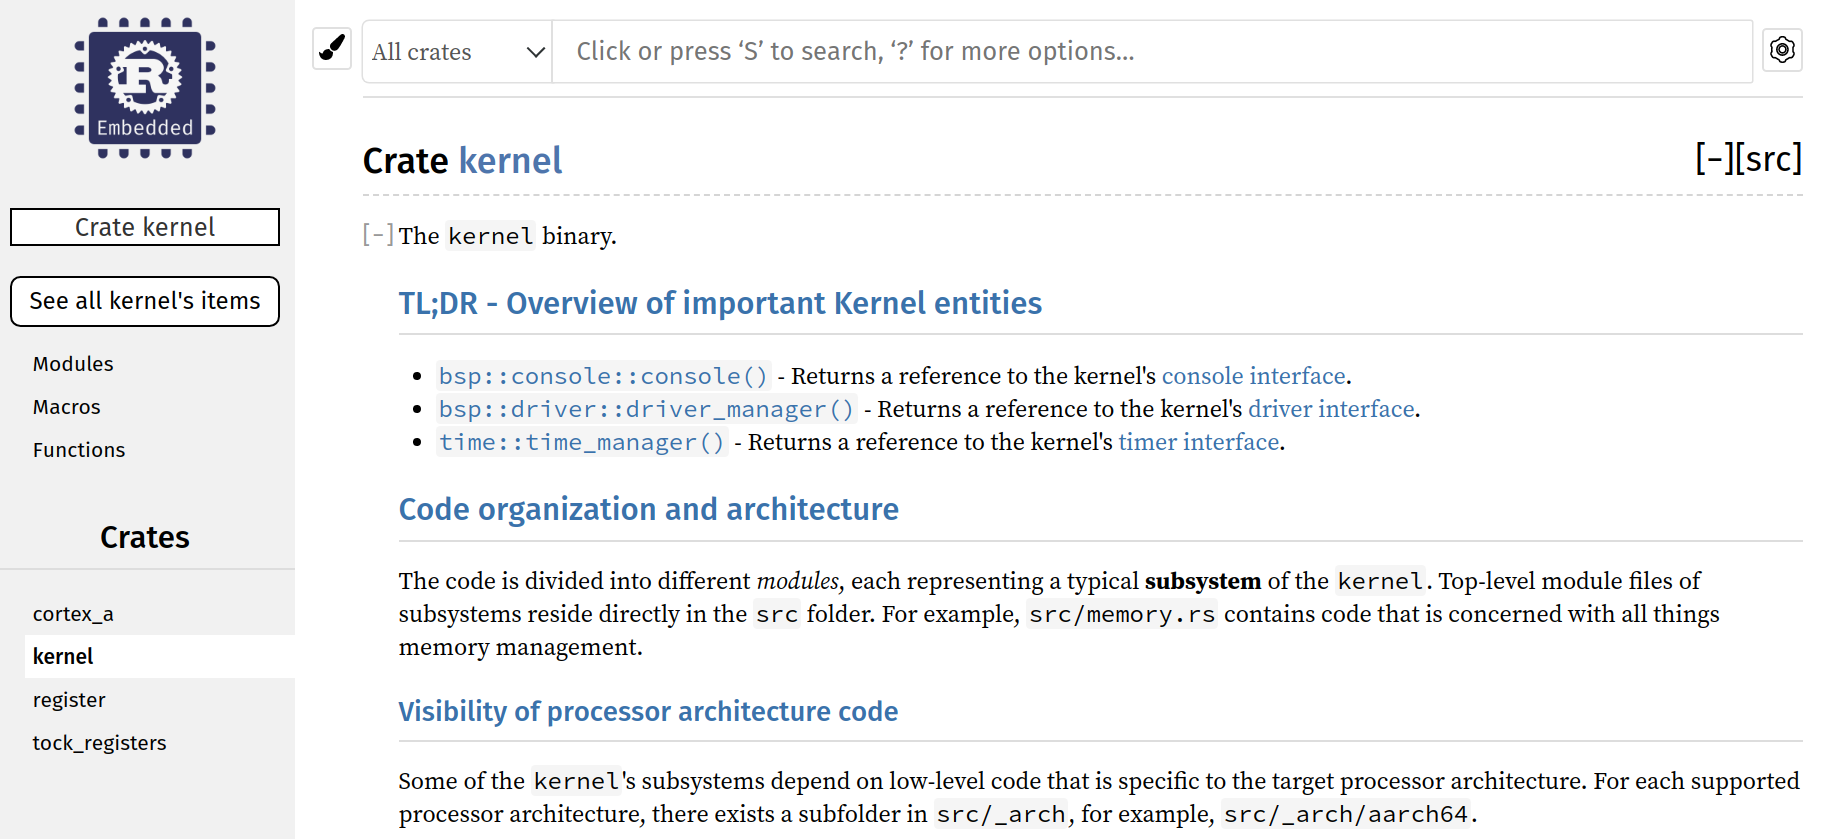
- In addition to the tutorial text, also check out the
make doccommand in each tutorial to browse the code, which is extensively documented, with HTML goodness.
Output of make doc
🚀 Ease of use
This series tries to put a strong focus on user friendliness. Therefore, I made efforts to eliminate the biggest painpoint in embedded development: Toolchain hassles.
Users eager to try the code will not be bothered with complicated toolchain installation/compilation steps. This is achieved by using the standard Rust toolchain as much as possible, and provide all additional tooling through an accompanying Docker container. The container will be pulled in automagically once it is needed. The only requirement is that you have installed Docker for your distro.
The development setup consists of the following components:
- Compiler, linker and binutils are used from Rust nightly.
- Additional OS Dev tools, like
QEMUorGDB, are provided by this container.
If you want to know more about docker and peek at the the container used for the tutorials, please refer to the repository's docker folder.
🛠 Prerequisites
Before you can start, you must install a suitable Rust toolchain:
curl https://sh.rustup.rs -sSf             \
    |                                      \
    sh -s --                               \
    --default-toolchain nightly-2019-12-20 \
    --component rust-src llvm-tools-preview rustfmt

source $HOME/.cargo/env
cargo install cargo-xbuild cargo-binutils
In case you use Visual Studio Code, I strongly recommend installing the
Rust Analyzer extension as well.
📟 USB Serial Output
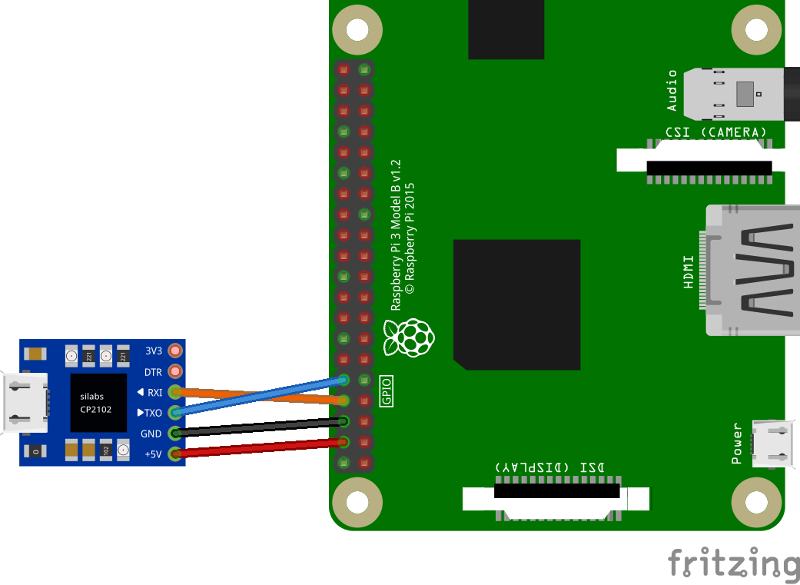
Since the kernel developed in the tutorials runs on the real hardware, it is highly recommended to get a USB serial debug cable to make the experience. The cable also powers the Raspberry once you connect it, so you don't need extra power over the dedicated power-USB.
- I use a bunch of these serial cables.
- You connect it to the GPIO pins
14/15as shown below. - Tutorial 6 is the first where you can use it. Check it out for instructions on how to prepare the SD card to boot your self-made kernel from it.
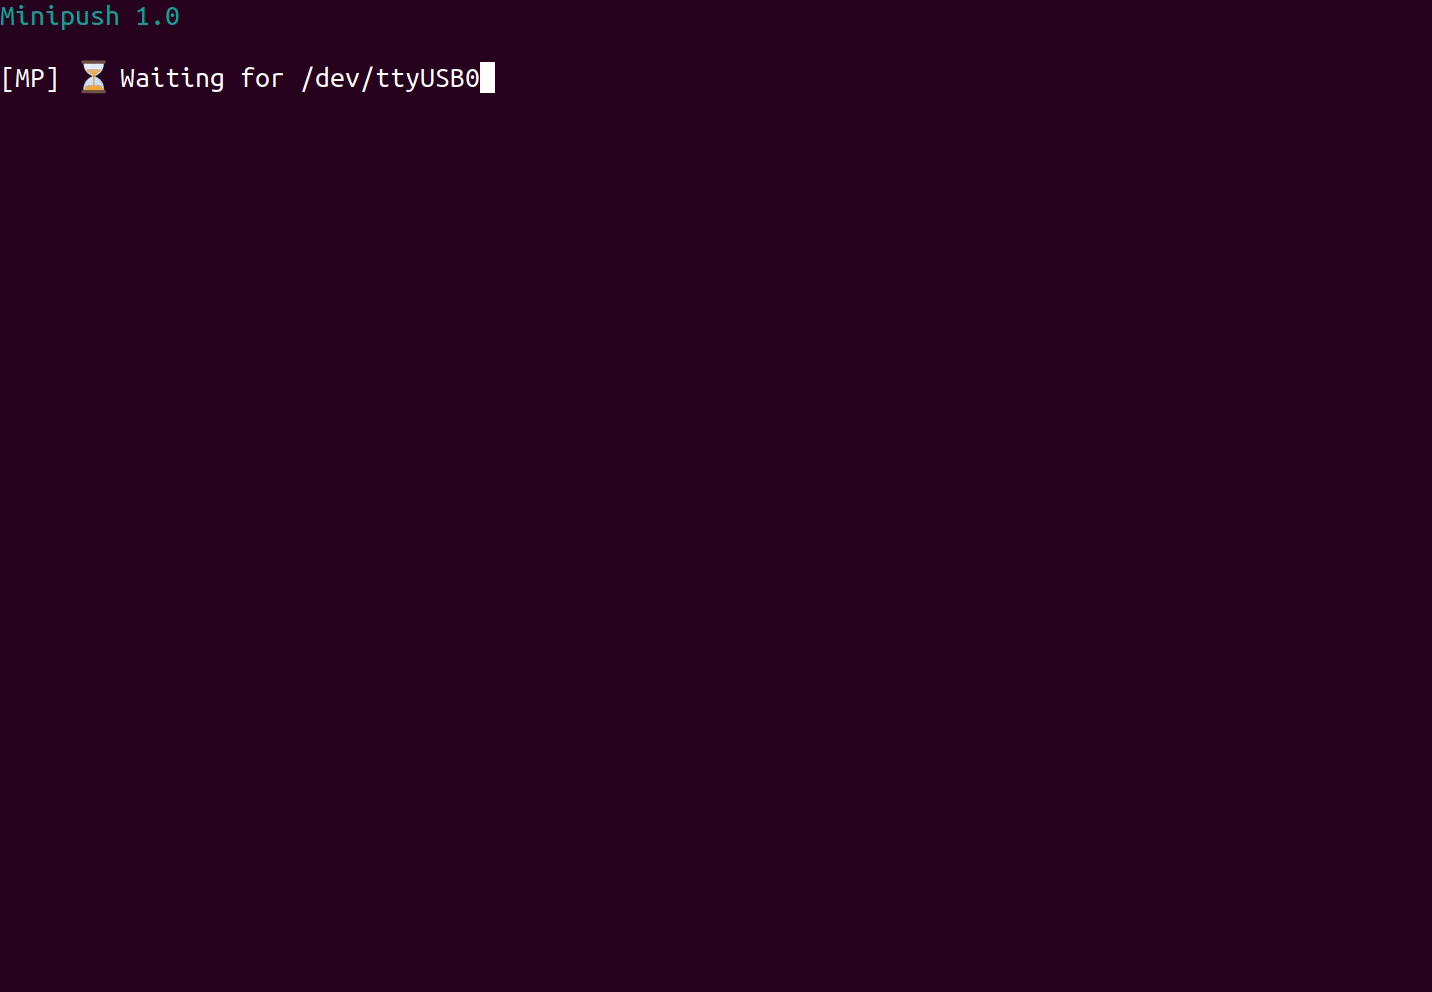
- Starting with tutorial 7, booting kernels on your
Raspberry is getting really comfortable. In this tutorial, a so-called
chainloaderis developed, which will be the last file you need to manually copy on the SD card for a while. It will enable you to load the tutorial kernels during boot on demand overUART.
🙌 Acknowledgements
The original version of the tutorials started out as a fork of Zoltan
Baldaszti's awesome tutorials on bare metal
programming on RPi3 in C. Thanks
for giving me a head start!
License
Licensed under either of
- Apache License, Version 2.0, (LICENSE-APACHE or http://www.apache.org/licenses/LICENSE-2.0)
- MIT license (LICENSE-MIT or http://opensource.org/licenses/MIT)
at your option.
Contribution
Unless you explicitly state otherwise, any contribution intentionally submitted for inclusion in the work by you, as defined in the Apache-2.0 license, shall be dual licensed as above, without any additional terms or conditions.